Create Accessible PDFs
Creating Accessible PDFs
1. Is PDF the best format?
Don’t use a PDF for:
- Online display or distribution of event posters. Include all text information in the body of your message instead of relying on a PDF.
- Forms. Use web forms or Word Documents instead, unless absolutely necessary.
- Frequently updated information. A web page with well-formatted HTML is accessible and easier to update.
Do use a PDF for:
- Text-heavy documents that your users will download.
2. Optimize your original document
- Follow the guidelines in the Accessibility Tips for Content Authors.
- If you’re starting with a paper document you need to scan, see Turn Scanned Documents into Accessible PDFs below.
Using Microsoft Word:
For more detailed instructions, search support.office.com
- Apply Styles: Find the style options in the Home tab. Highlight your text and choose the appropriate heading level. Open the Styles Pane to view more options.
- Modify Styles: Once you’ve applied the style to all your text, you can change fonts, colors, and other options to give it the look you want.
- Add Alt Text: Select the image and choose Format > Picture. In the Format Pane, find the Alt Text option, and add your text in the Description box.
Using Adobe InDesign:
- Create Styles: Open the Paragraph Styles Panel (Window > Styles > Paragraph Styles) and choose New Paragraph Style from the panel menu. For each heading level in your document, create a new paragraph style with your desired look, and save it with a descriptive name (ex. Heading 1, Heading 2), for your own reference.
- Apply Styles: Highlight the text and choose a style from your Paragraph Styles Panel.
- Set Default Export Tags: This matches your styles to PDF tags. Choose “Edit All Export Tags” from the panel menu. Make sure PDF is selected, then match your style values with the appropriate header level in the tags column.
- Add Alt-text: Select the image, choose Object > Object Export Options, and add your description in the Alt Text tab.
3. Export your document as an accessible PDF
Using Microsoft Word:
For more detailed instructions, search support.office.com.
Export as a Tagged PDF. Depending on your version of Word, find this option under File > Save As, or File > Export. Select the “best for electronic distribution and accessibility” option when you see it.
Using Adobe InDesign:
Export as Interactive PDF. File > Export > Adobe PDF (interactive). In the menu that appears after you click “Save,” check the boxes for “Create Tagged PDF” and “Use Structure for Tag Order.”
4. Add title and language to the PDF in Acrobat Pro
- Add a title: File > Properties > Description > Title
- Ensure title is read: File > Properties > Initial View > Show > Document Title
- Add a language: File > Properties > Advanced > Language
5. Adjust order and tags in Acrobat Pro
Be careful and save often! Modifying PDF tags can be hard to predict, and there is no Undo.
Check and Re-order Tags as Necessary
View the Tags Pane: View > Show/Hide > Navigation Panes > Tags
In the Tags Pane, you should see the document tags forming an outline of the document, including all the headings you created in Step 2. Focus on reading the list to check that outline items are all in the correct order, fixing one page of the document at a time.
- If tag pane says No Tags Available, right-click on that item and choose “Add Tags to the Document”
- You can turn on “Highlight Content” to view the corresponding tagged items on the page. Right click on any tag > Highlight Content.
- If any elements are missing tags (that is, if they don’t appear at all in the Tags Panel), add tags to them by opening the Accessibility Sidebar (View > Tools > Accessibility)
- Open the “Touch Up Reading Order” dialog box from the Sidebar
- Select the item to tag (image or text) by dragging a box around it
- Assign a tag by selecting the correct tag in the “Touch Up Reading Order” dialog box (“text” or the appropriate heading for text, or “figure” for images)
Check Reading Order
Reading Order dictates how the document is read aloud or displayed on small screens. The Reading Order is related to the tag order, but they are not identical. Be sure to save before you make any major changes.
View the Order Pane: View > Show/Hide > Navigation Panes > Order
- As with Tags, if items appear to be out of order, drag them to the right place in the tree.
6. Check for remaining errors.
Acrobat Pro has a built-in Accessibility Checker. You can run it by selecting Tools > Accessibility > Full Check and choosing OK.
- If you have already followed the steps in this guide, the report should have very few errors. If any remain once you’re ready to run the scan, you can right-click on them, choose “fix”, and follow the prompts.
Turn Scanned Documents into Accessible PDFs
Using PDFs scanned from print copies of a document should be your last resort if you can’t find (or create) a digital-born version of the document you’re working on.
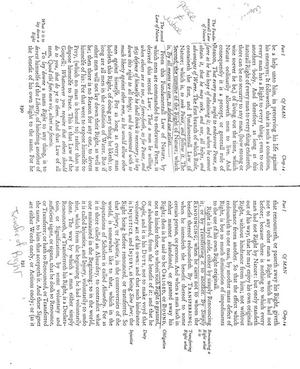
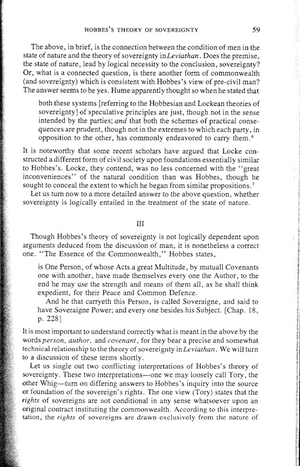
1. Use a Clean Scan
- No handwritten notes
- Text must be legible (not blurry or cut off)
- Text should be oriented in the correct direction
- Only one document page per PDF page
Example 1: Your document should not look like this one.
Example 2: This document is ready to be converted.
2. Convert with Robobraille
- Robobraille is an online text conversion service used by the College. It will recognize the text in the document, and also add tags.
- Choose Document Conversion as your output format (step 2) and Tagged PDF (text over image) as your target format (Step 3).
- Enter your email information and submit. Within a few minutes, you will be emailed an accessible PDF of your document.
3. Adjust your PDF in Acrobat Pro
Robobraille will deliver a fairly accessible PDF, but it may not catch everything.
If you can, use steps 4 through 6 of the Creating Accessible PDFs instructions (Add title and language, Adjust order and tags, and Check for remaining errors) to clean up your PDF document.